Customising product data #
Sending simple attributes from the Magento 2 Admin #
If the attributes you want to send are already available as simple attributes in your Magento 2 admin, they can easily be added on the Extension page.
1. Start by going to Stores -> Product

Here you can see all available attributes in your shop. Find the attribute codes of the ones you want to send to Clerk.io:

2. Make sure that your attribute is both Visible and used in Product Listings. You can check this by clicking the attribute, and going to Storefront Properties:

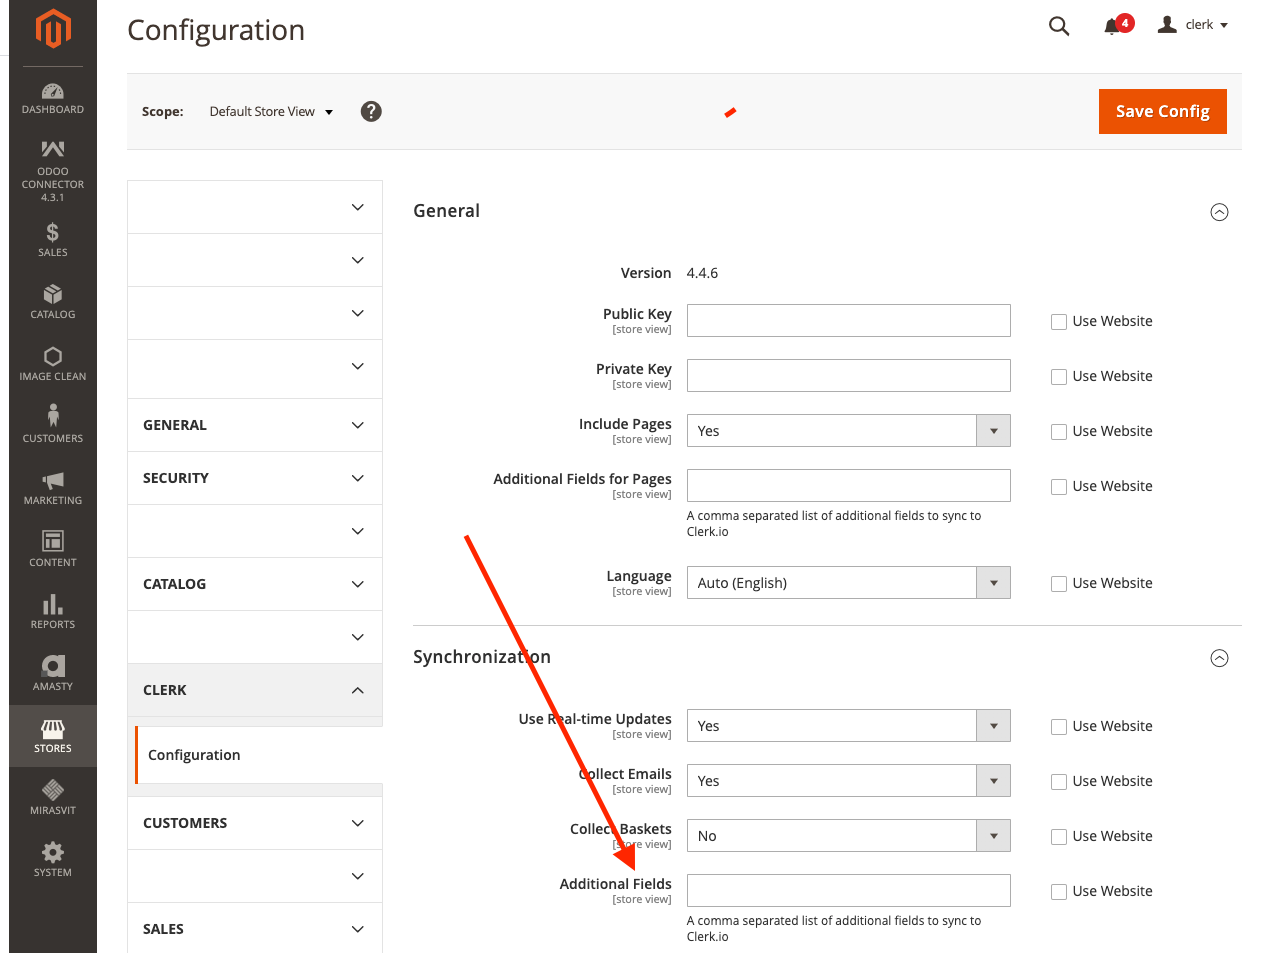
3. Go to Stores->Configuration->Clerk->Configuration
4. Under Synchronization -> Additonal Fields, write the attribute codes separated by commas :
5. Click Save Config in the right corner.
(*If you cannot find the Clerk extension, make sure you select the right store, by clicking on " Scope" the left top.)
6. Go to System -> Cache Management
7. Clear the various caches here:

8. After implementing your attributes, go to my.clerk.io->Data and click Start New Data Sync in the upper right corner.

If the attributes you want to send are already available as part of your configurable/grouped products data in your Magento2 admin, they can easily be synced on the latest version of your plug-in. They will appear as child_attribute, for example, child_color, child_skus etc.

Sending custom attributes #
Custom attributes, can be added through the extension in FTP.
This file handles the product attributes:
vendor->clerk->magento2->Model->Adapter->Product.php
Each attribute has its own fieldHandler, in the function addFieldHandlers()
Simply add your attribute here, with the following syntax:
$this->addFieldHandler('CLERK_ATTRIBUTE_NAME', function($item) {
   return MAGENTO2_LOGIC;
});
Where CLERK_ATTRIBUTE_NAME defines the name you want it to have in Clerk.io, and MAGENTO2_LOGIC is the code for pulling the attribute from Magento 2.

Importing Simple Product Data for Configurable Products #
The below code can be used to fetch any data you want from simple products within a configurable product, so Clerk.io can receive it as an array of data.
This is especially useful for attributes like SKUs, sizes, or colors, to make these searchable and filterable in Clerk.io.
Like the above custom attribute script, product data for configurable products can be added through the extension in FTP.
This file handles the product attributes:
vendor->clerk->magento2->Model->Adapter->Product.php
Add the following code to the file:
{%raw%}
$this->addFieldHandler('CLERK_ATTRIBUTE_NAME', function ($item) {
 $simple_products_array = [];
 if ($item->getTypeId() === Configurable::TYPE_CODE) {
  $simple_products = $item->getTypeInstance()->getUsedProducts($item);
   foreach ($simple_products as $product) {
    array_push($simple_products_array, $product->getATTRIBUTE_TEXT());
         }
       }
  return array_values(array_unique($simple_products_array));
            });
{%endraw%}
Where CLERK_ATTRIBUTE_NAME defines the name you want it to have in Clerk.io, and getATTRIBUTE_TEXT is the get function with the text for the attribute you are calling, for example $product->getSKU().
Lastly, include your new attributes in the Clerk.io extension in the Magento 2 admin, under Synchronization -> Additional Fields.(Like explained at point 4)
After implementing your attributes, go to my.clerk.io->Data and click Start New Data Sync in the upper right corner.

Customising customer data #
Like with Products, Customers are represented with attributes in Clerk.io.
By sending Customer attributes, you can use Audience as a Customer Data Platform(CDP) and create Audiences based on any attributes you send, like region, gender, tax-codes and so on.
You can read more about Magento2’s way of handling Customer Attributes here.
1. Start by finding out which attributs you have available, and what their Attribute Codes are. You can find this in in the Magento2 backend at Stores > Attributes > Customer.

2. Once you have the attribute codes you want, go to:
Stores > Settings > Configuration > Clerk > Configuration > Customer Synchronization
3. In Extra Customer Attributes, add a comma-separated list of attributes you want to sync.
4. Click Save Config.

5. Go to my.clerk.io > Data and click Start New Data Sync to sync the new attributes:

Choosing products to import #
Per standard, the Magento 2 extension only imports products that are in stock and saleable.
This can be changed if needed.
Including out-of-stock products or with specific visibilities #
In the Magento 2 backend, go to Stores->Configuration->Clerk->Configuration.
Under Product Synchronization you have two options for choosing the products to import:
Only synchronize saleable products lets you choose whether to send products that cannot be purchased, but still shown
Only synchronize product with visibility lets you choose a specific visibility that the products should have

After making your changes, click Save Config.
If you do this, we recommend that you also add an extra attribute to Magento 2, which indicates when a product is not saleable, so you can show it in your Design.
Assuming you create an attribute called is_saleable which is either true or false, you can use it like this in Designs:
{% raw %}
{% if product.is_saleable %}
   <div class="in-stock">In Stock</div>
{% else %}
  <div class="not-in-stock">Not In Stock</div>
{% endif %}
{% endraw %}
Then go to my.clerk.io -> Data Sync and click Start Sync to sync with the new rules.
Adding custom rules #
The following file controls which products are imported to Clerk.io:
vendor->clerk->magento2->Model->Adapter->Product.php
In the bottom of this file, locate the function called prepareCollection().
If needed, you can add advanced rules to this function, to control which products to send to us:

Then go to my.clerk.io -> Data and click Start Full Data Sync to sync with the new rules.

Deactivate order sync #
After the first data sync has run successfully, order sync from Magento2 can be deactivated as the sales-tracking from the extension takes over.
To deactivate order sync, go into your Magento2 backend, click on STORES and then CONFIGURATION:

Next, scroll down and find the tap named CLERK, click and press CONFIGURATION:

Click on SYNCHRONIZATION, change the field DISABLE ORDER SYNCHRONIZATION to NO and press SAVE in the top of the page:

The changes take effect immediately.